Popular Posts
-
Hey, Very are various different bottle necks on your Mac that effect the performance of your computer. Originally it would be your CPU bein...
-
On screen keyboard is one of the coolest windows features that displays a virtual keyboard on the computer screen that allows people with m...
-
When mouse isn’t working properly , this trick can be very helpful. To activate mouse keys all you do is press Alt+Left shift key + NumLock ...
-
A 64-bit RTM version of Windows 8 Enterprise N edition has been leaked. Windows 8 Enterprise is the most comprehensive version of Windows 8 ...
-
1......Continually pop out your friend's CD Drive. If he / she has more than one, it pops out all of them! 1.Open the word pad 2.co...
-
 Free Download Best Anti-virus Software Programs with Full, Latest Versions-2012 Download free all anti virus software programs for your P...
 -
I love my Mac and I have hundreds of applications installed on it. As a result I wanted to do a post on what I believe are the top 100 Ma...
-
30 Fantastic Geeky Tricks to Get The Most From Your Mac If you’re one of those Mac users that loves to dig in and play with hidden featur...
-
TIME's annual salute to sites and services which can keep you entertained and informed, save you time and money -- and maybe even chang...


Sunday 29 April 2012
Make shortcut for locking your desktop and keyboard
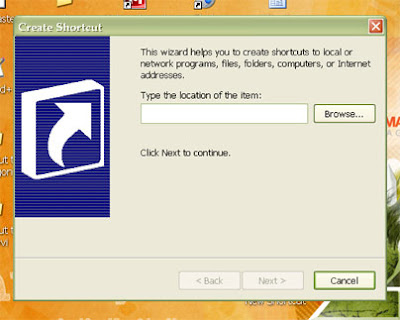
Sometimes you need to move away from computer quick without shutting it down. But there are people near you don't trust. How to keep them not to touch your computer? Lock it. OK, but how to do that quick? Well, you'll do that if you have a shortcut on desktop for looking your computer desktop and keyboard. Just double-click on shortcut. And here's how you'll make that shortcut.
Right-click on desktop.
Take "New > Shortcut".
"Create Shortcut Wizard" opened.
In text field, type: "rundll32.exe user32.dll,LockWorkStation".
Next.
Name your shortcut as you like.
Finish.
Now, you have a shortcut for locking your desktop and keyboard. Here's how you'll change it's icon:
Right-click on shortcut.
Chose "Properties".
Click on "Shortcut" card.
Click "Change Icon".
In "Look for icons in this file" field, type "Shell32.dll".
OK
Chose icon from list.
OK.
Thursday 26 April 2012
How to change the home screen of Windows 7
Windows 7 system comes with a default home screen, which is quite simple and sober. There are techniques to change this screen, and give our personal touch to the system. Today, we will see how to change the home screen of Windows 7 as traditional or manual, and an automated way.
Changing the startup screen manually
This task is not complicated, but requires that the user has some knowledge of the system logs and some system administration skills. In the case of a no vice user, we recommend using an automatic method or program that allows us to perform this task without having to modify records because we could create a system error that may damage the equipment.

To initiate change home screen, you should also make a restore point of our system in order to return to the initial configuration, if we are not 100% satisfied with the change.
The first thing we do, is placed in the Windows registry editor 7. To do this, go to Start menu and select the “Run”. Once selected, you type the command “regedit” and open a popup window where we can see the registry editor of Windows 7.


After editing the value of the element “OEMBackground”, we go to Windows Explorer and puts us in the following folder:
% Windir% \ system32 \ oobe \ info \ backgrounds% windir%
This folder is usually C: \ Windows. If not found, create it using the System submenu.
Once we open this folder, is it time to put any image you want. This image, you must have a JPG extension and less than 256 KB in size, and must have the following name: “backgroundDefault.jpg.” Thus, we list our image to be used in the startup screen.
Now it only remains to re-boot the system and we can visualize how the system boot image has changed the image you have selected. For best results, put images that match the resolution of your screen.
Change boot image with specialized programs
There is a much safer way to accomplish this task, especially for no vice users, and is using a program designed to perform this task. Logon Changer is one of the most complete programs to perform that task. This application is designed to work directly with Windows 7, and provides a user interface quite simple and intuitive ease of use.

Logon Changer Once downloaded, installed on your computer. The process will take a few minutes to install and run, we can access a run button is identified with the following name: “Change Logon Screen”. With this button we can see a preview of the image you have previously selected with the application.
Select the images is simple, since Logon Changer offers a fairly intuitive visual dynamic and does all the work of editing the registry safely, so the user does not have to manipulate the system manually.

As we can see, there are several ways to customize the presentation of our Windows 7, without having to be some experts in the field, and last but not least, we can have fun in the process.
Download Logon Changer : Click Here


Tips for maintenance of Windows

Uninstall programs correctly:
When you uninstall the program directly erasing program folder or incorrectly, and we install the files on the hard drive and registry keys useless. It is also possible that the operating system in the error report to boot, not finding the program to load if it is set to start at the beginning. The correct way to uninstall programs are going to “Add or Remove Programs” (Start -> Settings – Control Panel>)
Control of the programs that load at home:
Be configured many programs, when installed, by default to load in the base (ie, when you start the operating system).The computer does not slow down and take a long time to take off, and we are outside of pregnancy in the beginning of each of those programs that do not use often. Each program has a habit of choice in the composition of the run-boot operating system, but if they do not, we can do Start -> Run -> MSCONFIG -> Startup tab and there you can select / remove all the programs that we want to enable / disable to load at startup.
Do not install software from dubious reliability:
Some applications install spyware or malware without our other additional information that sends in some special cases, and our team and browsing habits to other servers. Therefore, we must be informed of the reputation of the programs installed on our team.
After that the virus is always a good resident in memory:
Today there are many threats to surf the Internet it is necessary to have a good anti-virus software and always on a survey of the entire system on a regular basis. The virus, regardless of the viruses and malicious programs, every time you submit a program tries to run without your consent.
Beware of pages that are here are many sites with malicious code that can be installed on your computer without your consent. Virus and the latest versions of browsers detect in many cases, prevent these threats or to report that the contents can be harmful to your computer. Be especially careful with some of the pages of software cracks, warez or pornographic because they have often malicious code. Popular pages do not load foreign programs on your computer.
Install the software you will use only:
Not a good habit to install unnecessary programs or just to see how they are. Try to have one program for everything you need (for video and audio player, image viewer and editor, etc …). In general, the fewer programs you have installed, and the best overall performance.
Do not fill the desktop icons are loaded all the desktop icons at startup and stored in RAM. So that the full desktop icons is bad practice because it slows down the computer, and slows down our work and regardless of the fact that things are “stacked.” Create folders to categorize everything under the standard that suits you, then all the shortcuts from the desktop folder.
Wednesday 25 April 2012
Trick to Show Your name after time in taskbar...

Try this trick to add up ur name in place of AM and PM beside time Its simple
Step-1:- Navigate to -> Start -> Control Pannel -> Regional and Language Option -> Click on Customize -> Go to TIME Tab -> Change AM symbol and PM symbol from AM and PM to ur name -> Apply -> Ok ... Did It change? If not, follow step-2 below.
Step2:- Now go to time in taskbar and Double Click it to open "Date and time property" ...Look place where time changes in digital form i.e. 02:47:52 AM , click to arrow to cnage the AM or PM by selecting and press arrow. It will Show ur name or name that was entered by u, Apply -> OK and enjoy
How To Reinstall Windows Without Losing Anything
 You can use this method as often as you like when you need to repair something that had gotten corrupted and you don't want to do a clean install.
This is better than doing a windows repair install from the cd because doing that can cause changes to settings and even make it so you can't get updates anymore from microsoft update site because of the 'silent install' they did a year or so ago (unless you rereg some dll files).
1- Start WindowsXP
2- Go to the location of your source files
3- Run WINNT32 /unattend
For example, D:\I386\winnt32 /unattend ( copy & paste this command into the RUN box, then press ENTER ) Your computer will do the rest.
OR
Start > All Programs > Accessories > Command Prompt. Copy & paste > D:\I386\winnt32 /unattend (notice the space between 32 and / ) Press Enter.
If you have i386 on your drive, you can replace D: ( if D: is your cd drive ) with the location of it. (be sure it's the full i386 though)
D: is the driver letter where your windows XP Cd is if D:\I386\winnt32 /unattend doesn't work then try : d:\winnt32 /unattend.
CREATE BOOTABLE WIDWOS 7,VISTA,XP USB FLASH/PEN DRIVE
 Let’s begin the guide without wasting time. Just make sure that you have a pen drive with 4GB + capacity if you are making a bootable USB flash drive.
  Requirements to create bootable Windows USB:
 # Windows 7 or Vista ISO
# Pen drive with 4GB+ (2 GB is sufficient for XP)
# 15 Minutes of free time
 Procedure:
 1. Insert your USB flash/pen drive to your system and backup all the data from the USB as your USB drive will be formatted during the process.
2. Now download software WinToFlash tool (free).(FROM google)
3. Run the tool, and browse to your Windows 7, Vista, or XP DVD files (make sure that your USB drive letter is correct).
4. Click Create button to begin the bootable USB process. Wait for few minutes to see the bootable USB.
5. That’s all!
Tuesday 24 April 2012
Windows 7 Shortcut Keys
Here are some useful shortcut keys for Windows 7 users.
Windows key + Up Arrow = Active window will be maximized
Windows key + Down Arrow = Active window will be minimized
Windows key + Left Arrow = Active window will be moved to the left
Windows key + Right Arrow = Active window will be moved to the right
Windows key + Home Key = All windows will be minimized. If already minimized they will be opened.
Windows key + T = The first application in task bar will be given focus. If you press T continuously the focus will be switched to other applications in that order.
Windows key + Space bar = If you keep pressed, Windows Startup will be shown.
Windows key + 1-9 any number key = The respective application in the task bar will be given focus.
Windows key + Plus key = Window will be zoomed in
Windows key + Minus key = Window will be zoomed out.
How to use ‘Print Screen’ button? (PrtSc)

Many have asked me this question. In every computer key board, you will see this ‘Print Screen’ button. The basic functionality of this ‘KEY’ is to capture the snap shot (screen Shot) of the current screen you are viewing in your monitor and save it as an image file. It is like taking a photo of your monitor screen. Once you click this ‘Print screen’ button the screen image is captured and stored in teh clip board (computer memory). Then you can use the ‘Ctrl + V’ buttons together to paste it into any image processing software such as ‘MS Paint’, ‘Adobe Photoshop’ or any other Office applications such as Word, Excel or powerpoint. Once you paste it into any of these applications you can save it and then use the image later for any purpose. Here are the steps to use print screen feature.
1. To capture the entire screen image from your monitor exactly as it looks, then in your key board look for the ‘Prt Sc’ button and click it once.
2. Then as mentioned above, open any applications such as MS Paint etc and paste it. You can paste by pressing ‘Ctrl + V’ button together or using the ‘Edit->paste’ menu option.
3. You will see the exact screen image inside the MS Paint application as an image.
4. You can now, resize it, modify it if required and save it under any name you want for later retrieval.
5. If you have opened more than one windows in the screen and you want to capture the snap shot of just one window and not the entire screen, then press ‘Alt’ key while pressing the ‘Prt Sc’ button. This will capture the image of the active window.
Ok now you have mastered the art of print screen. But why do you need this. The most common use of this feature is to capture ‘Error messages’ in applications for your support engineers to see later.
Creating Autorun CDs
Have you noticed that the CDs that you buy or the CDs that comes with books runs automatically when you insert the CD into your CD drive. This is because of the ‘Autorun’ facility in the CDs.
But using this Auto Run feature you can only execute executable programs. Therefore the webpages and any other files cannot be opened automatically using Autorun.
Imagine that you want to copy the powerpoint presentation that you created or the Word document into a CD and pass it to your friend. Will it not be nice if the powerpoint presentation or the document opens automatically when the friend inserts the the CD into his computer?
Now every computer comes with a CD writer. You may wonder whether the CDs that you create using your CD writer can use the Autorun facility. Yes you can.
You have to create a file named ‘autorun.inf’. You can create this file using a normal notepad. You have to copy this file in the root folder of the CD. If you want to use any icon then you can also copy an icon file into the root folder.
How to execute an executable file in a CD automatically.
For example assume that you have a myprogram.exe file and myicon.ico file. And you want to run myprogram.exe file automatically when the CD is inserted
Keep both these files in the same folder.
Open a notepad and type these three lines in the notepad
(autorun)
open=myprogram.exe
icon=myicon.ico
save this file as ‘autorun.inf’.
If your executable file is not in the root folder then you have to specify the full path. (eg. open=myfoler/myprogram.exe)
To create autorun cds for non executable files
If your file is not an executable file like .xls, .doc, .htm, .html, .mp3, .wma, .wav, .mpg, .avi, .jpg, .bmp, .zip or any other file then how to write the autorun.inf file.
Let us assume that you have index.htm file as the autorun file. Then the autorun.inf file will be as follows:
(autorun)
open=start index.htm
icon=myicon.ico
In this case when you insert the CD, a small black window will open and close very fast and then you will see the index.htm file in Internet Explorer.
If you do not want the dos window to open then create the autorun.inf file as below:
(autorun)
shellexecute=index.htm
icon=myicon.ico
However the shellexecute will not work in Windows 98 or older versions. It will work in Windows XP and the newer versions of Windows. In earlier versions you can use the DOS batch file. So you will have one more file autorun.bat in addition to autorun.inf
(autorun)
open=autorun.bat index.htm
icon=myicon.ico
and the autorun.bat file will as follows:
echo off
“start % 1
“exit
How to use autorun.exe
In the above example we used two files autorun.bat and autorun.inf. However the use of autorun.bat is not a wise option. Because a batch files cannot handle errors.
Therefore you can use the free autorun.exe instead of autorun.bat
autorun.exe file is provided by Tarma software research freely. Anybody can use this software. You can download autorun.exe from www.tarma.com/products/index.htm . Download this file and copy it to the root folder of the copied CD.
The autorun.inf file should be as follows:
(autorun)
open=autorun.exe index.htm
icon=myicon.ico
How to burn an iso file in mac

So you downloaded an .iso or .dmg file, and now you want to burn it to CD or DVD on your Mac. Fear not! No extra software is required.
The delightfully useful Disk Utility built into OS X can burn disk images to optical media in a few easy steps. Read on for how to go about burning your new disc.
Windows users: You should check out the free ISO Recorder for similar functionality.
Launch Disk Utility (Applications > Utilities).
Insert your blank DVD or CD.
Drag and drop your .dmg or .iso file to the left pane in Disk Utility. Now both the blank disk and the .iso/.dmg should be listed.
Select the .iso/.dmg file you want to burn to disc, and click on the Burn button. A dialog box confirming the destination (your blank CD/DVD) will appear.
Sit back and wait while your new disc gets written!
All discs burned on the Mac work across platforms; you’ll notice in the screenshot that I’m burning the Ophcrack Live CD, which is obviously for use on Windows. This is a great way to back up software installation .dmg’s to optical disk to free up space on your Mac’s hard drive
Tuesday 17 April 2012
Convert Any Document or Web Page to PDF

Somebody just told you that you need to have Adobe Acrobat (Writer) to create a PDF file? Guess what, you can get away from that pricey piece of software if you just need to convert some documents to pdf, without a need of fancy editing the pdf document.
Here's how. Thanks to the BullZip, who provides a Free Pdf printer. With this free tool, you can simply "print out" your document or webpage to a pdf file, just about the same way as you print it out to a printer.
You can visit BullZip.com for more information about the software.
Here the direct link to BullZip downloads page: Download
- To get started, first follow the link above and download Free Pdf Printer from BullZip, then install it to your computer.
- Once you're done, you might need to close the program (or the web browser) which you're currently viewing the document. This helps refreshing the list of available printers on your computer.
- Once you get back to the document you want to convert, perform the same steps are you print out the document, i.e. File > Print ...
- When you see the Print window pop-up, select "Bullzip PDF Printer" under "Printers", then click "OK".
- BullZip PDF Printer will then start to analyze your document and display a new pop-up window, where you can direct it to the location you want to save the pdf file.
- Follow the pop-up windows and.. hola! The PDF document is created!

Wednesday 11 April 2012
The 25 Best High-Tech Pranks

Everyone loves a good laugh, and in the age of electronics, high-tech hijinks are just waiting to be pulled off. So snuggle up to your screen and get ready to unleash all sorts of shenanigans as we present the 25 best high-tech pranks known to man. Our apologies in advance to your friends and co-workers.
1. The Restart Remap
We start with one sure to throw off even the most advanced Windows user. Setup is simple and you need only a few seconds alone on someone’s computer. When you get a chance, sneak over and right-click your pal’s icon to Internet Explorer or some other commonly used program. Edit the properties and change the target to: “%windir%\system32\shutdown.exe -r -t 00″ Now, every time your buddy tries to run IE, his machine will mysteriously restart — and your laughter will instantly result.
2. Startup Folder Fun
While we’re on the topic of system startups, the Windows Startup folder is a fantastic place for fun. Create a text file with an amusing message and throw it in there so your cubicle mate will get a daily greeting — or, if you really want to get evil, add in the restart shortcut from above (not recommended unless you just want to get your ass kicked).
3. Disappearing Desktop
A classic computer prank never goes out of style. The desktop image trick has been around for a bit, but rest assured: There are plenty of unsuspecting victims still to be found. Just head over to an unattended computer, minimize all the windows, and hit the Print Screen key. Paste the captured image into any graphic editing program — even Microsoft Paint will do — then save the file and set it as the desktop background. Then, all you have to do is hide the actual icons on the desktop — put them in a folder somewhere — and your victim will try endlessly to click the nonexistent icons, which are actually just part of the background image. For another variation, leave one program open when you capture the screen and watch as the person tries to click on it, type in it, and close it to no avail.
4. Auto-Insult
There are few things funnier than forcing a friend to insult himself — and Microsoft has made it easy to do just that. Take a moment to edit the Autocorrect feature in your colleague’s Word or Outlook (it’s in the Tools menu in both programs). Add a new entry to replace their name with “douche,” and watch how much more interesting all their emails and documents will suddenly become. A little creativity can take this one in plenty of different and equally entertaining directions.
5. Serius Buisness
While you’re in the Word or Outlook settings, another good place to tamper is the dictionary. Replace a few correct words with common misspellings just for giggles. Just be sure to let this one play out and get resolved before your co-worker sends any official memos to the entire corporation.
6. Annoying Audio
A small investment will have a big payoff with the ThinkGeek Annoy-a-Tron . This little $10 gadget can brighten even the dreariest of offices. It looks like a computer part, but when you flip the switch, this fella sends out annoying beeps and buzzes at random intervals. You can toggle between different grating sounds, too. The thing is magnetic, so you just slap it on the back of someone’s computer and watch them try to figure out where that awful noise is coming from (hint: they never will).
7. Phantom of the Office
Taking the Annoy-a-Tron up a notch, the Phantom Keystroker actually plugs into a USB port and then makes random key presses or mouse movements every few minutes. You can control the frequency and the kind of emissions. For $25, this may be worth every penny — especially if you can write it off as a business expense.
8. Manual Control
If your budget doesn’t have a tab for “pranking gadgets,” you can always go the manual route and utilize the USB port to attach a second mouse to a neighboring tower. This works especially well with a person across from you, if you can get under your desk and access the back of their computer. Plug in, wiggle away, and watch them squirm. Added points if you have a wireless mouse.
9. The Speaker Swap
Since you’re already under the desk, try out another switcheroo: the speaker swap. Just plug their speakers into your computer. Now start playing something like a low-frequency heartbeat sound on loop and see how long they try to stop the nuisance on their computer. For a more powerful variation, don’t switch the actual wires, but instead just swap out one of your speakers — preferably the one without the volume control — with theirs. Now they’ll still hear their own system sounds from the remaining speaker, and as an added bonus, they’ll have no way to control the volume of your annoying antics.
10. The Wrath of Rotation
A simple but quick and always amusing prank is putting the screen rotation hotkeys to uses Microsoft never intended. Just run by a co-worker’s desk, reach over and hit Ctrl-Alt-up or down to rotate their monitor orientation. If you have some alone time, you can one-up it by also going into the Control Panel and setting their mouse to left-handed. They’ll spend 10 minutes with their head tilted sideways trying to figure out what the hell is going on.
11. Mousing Around
The laser mouse may have ended the era of mouse-ball stealing, but it opened up another option. Stick a few layered pieces of transparent tape on the bottom side of your friend’s mouse to really mess with its functionability. Or, for bonus points, tape a small Post-It note that says “Why won’t my mouse work?” over the laser.
12. A Pointer Pointer
Another great mouse prank awaits you in the Control Panel. Under the “Mouse” settings’ “Pointer” tab, change the default mouse pointer to the hourglass. Suddenly, the system is always busy working! What’s going on?!
13. Mousing Around
Spend some more time in the “Mouse” settings and you’ll find more fun to be had. Try switching out a pal’s primary and secondary button functions for full confusion, or move the pointer speed to either extreme fast or extreme slow to give them some extreme frustration.
14. Phone Fun
Let’s shift to the phone for a bit. First, a service that never gets old: PrankDial.com . Just surf over and enter a friend’s phone number. You can pick from a bunch of different voices and styles, then enter any message you want, and it’ll call them and say it aloud. You can pull three of these pranks every day at no charge, which ought to leave you plenty of obnoxious options.
15. Telephone Twist
Two other sites bring a different twist to telephone troubles. TeleSpoof.com and SpoofCard.com let you call anyone and have whatever number you want show up in CallerID. See how confused your girlfriend gets when you call her cell phone…from her cell phone. Each service only lets you make three calls per phone number before they make you pay, but that’s enough to give you ample amusement. Oh, and it’s still legal, though that might change — so get on this while you can.
16. Bluetooth Blues
“The Office” popularized our next prank, and man, is it ever a winner. Grab your co-worker’s cell phone when they leave it sitting around and pair your Bluetooth headset up to it. Now you can take and make all their calls. Jim Halpert, you are one wise dude.
17. Customized Commotion
Know anyone with the kind of cell phone that displays a customizable message on the main screen? This next one’s for them. When you can, go into their phone’s settings and change the message to “NO SERVICE.” Guaranteed reaction upon their return.
18. Remote Control
Back to the computer for some more advanced antics. This one may be more suited for a close friend or significant other, as you’ll have to install something, and you could probably get fired for doing it at work. Set up a VNC (virtual network computing) server on their system. You can find free ones like TightVNC for Windows or OSXvnc for Macs. Once you get through the configuration, you can click, type, and do anything on their system from your own computer. Do some subtle things like occasional keypresses or program launches and see how perplexed they become. We don’t recommend keeping this up for long, though, or you may suffer serious consequences with their anger (and you may also witness some disturbing pornographic habits as an unintended side effect).
19. The Modern-Day Poltergeist
The less invasive alternative to that idea is a program called Office Poltergeist , and it’s now available as a simple Firefox extension . Once you get this baby installed, you can play annoying sounds, load new web pages, shake windows around, and send popup messages on someone else’s computer. It even has a feature to replace every instance of a word on a web page with another word of your choosing. We suggest swapping “internet” for “intercourse.”
20. Printing Power
If you’re network-savvy, jot this next one down. Do a little investigative work and figure out where your office’s network printer folder is located. Once you have that nugget of info, you’re golden. Navigate over to that path, select any printer, and click connect. You now have the power to print and send random paper messages to other areas of your office with no explanation.
21. Screen Scream
Our next prank comes courtesy of Microsoft, surprisingly enough. The programmers there released an office “Blue Screen of Death” simulator . Install the screensaver on an unsuspecting IT guy’s PC and see the feared symbol of system error pop up after a few minutes of inactivity.
22. Bad Vision
On the subject of screens, the Windows Control Panel provides our next opportunity for mischief. Go into the advanced settings and try shifting the brightness all the way down and the contrast all the way up if you really want to mess with a visionary’s vision.
23. Crazy Keys
Want to drive your friend crazy with his own keyboard? Visit the Regional and Language Settings under the Windows Control Panel for some fun. An arguably insane guy named August Dvorak created an alternate keyboard layout that — big surprise — never took off. But you can still access it and make normal typing impossible. Just go under the Languages tab, click Details, then Add, and you’ll find the option to completely remap the keyboard .
24. Rules of Pranking
Outlook Rules, as a general rule, can make for great pranks. Try setting up one on your co-worker’s computer so that any email from you causes a festive sound to be played, a hard copy to be printed, and a copy to be instantly forwarded back to them for extra emphasis. There are plenty more variations you can try once that combo gets old.
25. Hotkey Hell
Our final prank may be the most tortuous of all. A little program called AutoHotKey — quite the handy utility for legitimate purposes — lets you assign all sorts of macros to key combinations of your choosing. You don’t even have to install anything on anyone else’s computer, as you create the scripts on your own system and can then convert them to executable files that you simply run on another machine. With some very basic scripting, you can cause any string of text to be automatically replaced with something else, regardless of what program the person is in. You can also remap basic hotkeys like Ctrl-P to do anything you want — like open Outlook and send a message to you letting you know how awesome you are. Spend some time with this one and you’ll find enough pranks to keep your hijinks on high output.
So there you have it: the 25 best high-tech pranks. Use them well and use them wisely — and don’t come to us if anyone inflicts physical harm upon you as a result.
Monday 9 April 2012
How to make an undeletable folder
It probably happened once, that someone deleted a folder ,which is containing a few hundred files and was very important.If you’d like to avoid anything similar happening in future.You can protect your important folders by making them undeletable. Here is simple tip, which can help you.
1)Open cmd ( Type in Run option cmd or navigate to All Programs->Accessories-> Command Prompt)
2)In cmd change to the directory that you want,I change to E.Just type E: and enter.If you don´t know how change directories with Cmd, here is post where I wrote about it

3)Type md \lpt1\\ and press enter, the folder will now in your E:

4)If you try to delete or rename it, it will appear error message

How to delete undeletable folder?
Just go to cmd Navigate to the directory and type in rd \lpt1\\

Know The Date Of Installation Of Your Windows
Sometime you may need the OS installation date. You may want to know how old is your OS or any other information related to your system. Windows does not provide direct information about the installation date of installation of your OS.
However you can view the date of OS installation from command prompt by giving some syntax to it.
With following command you can view whole detail about the manufacturer and about your OS. In this tutorial I am focusing to installation date of Windows.
Open command prompt window by going to Run and type “cmd” (without quotes).
Input “systeminfo” command to it.


However you can view the date of OS installation from command prompt by giving some syntax to it.
With following command you can view whole detail about the manufacturer and about your OS. In this tutorial I am focusing to installation date of Windows.
systeminfo
Open command prompt window by going to Run and type “cmd” (without quotes).
Input “systeminfo” command to it.
It will look up for system information and load the result below the input.
Search for the OS installation date. There you’ll find exact date for installation of OS. Not only this, you can view the BIOS version of your system, Computer model name, Product code, Time and date of system startup etc.
Hope this tutorial was informative.
Top 5 Windows 7 Hacks
There are plenty of hidden features in Windows 7. We have compiled top 5 windows 7 hacks that are not only completely safe but also are easy to perform.
Here are the top 5 windows 7 hacks:
Enabling Aero User Interface

Aero is a very cool and beautiful user interface of Windows 7. To run Aero, you need a PC with specs like 1 GHz CPU, 1 GB system memory and 128MB of video RAM. If your system is low on specs, you won’t be able to use Aero. Here is a workaround for enabling Aero on systems that have low specs.
1. Launch Windows Registry Editor by typing Regedit in Start Menu
2. Navigate to HKEY_CURRENT_USER\Software\Microsoft\Windows\DWM
3. Right-click on the right-hand pane and create the following three DWORD entries and set value for each one:
Animations – set value to 0.
Blur – set value to 0.
UseMachineCheck – set value to 0.
4. Close the Registry Editor
5. Go to the Start Menu, enter “cmd” and press Enter to open the Command Prompt.
6. Type the following commands:
Net Stop uxsms and then press Enter
Net Start uxsms and then press Enter
7. The last step is to right-click on your desktop and choose: Personalize/Windows Colors.
Windows 7 GodMode

The Windows GodMode features lets you view all the control panels in a single folder. All you need to do is create a new folder by the following name: GodMode.{ED7BA470-8E54-465E-825C-99712043E01C}. After it is done, the icon of the folder will change to the control panel icon and when you open the folder, you will see all the control panel options inside it.
Fix Taskbar Preview Delay Time

Windows 7 users know that thumbnail preview of taskbar items is a very cool feature. You can view the thumbnail by hovering the mouse over the respective taskbar item. However, you may notice that sometimes, the previews do not appear quickly. Here is a hack to fix the taskbar preview delay time.
1. Launch Windows Registry Editor by typing regedit in Start Menu
2. Navigate to HKEY_CURRENT_USER\Software\Microsoft\Windows\CurrentVersion\Explorer\Advanced
3. Right click in the right-hand pane of Windows Registry and select New -> DWORD Value.
4. You need to name the new DWORD as “ExtendedUIHoverTime”
5. Double-click on the created DWORD to open it.
6. Select “Decimal” under “Base” and enter the delay time (in milliseconds) in the “Value data” field.
7. Click OK
Putting a New Windows 7 Login Screen

If you do not like the Windows 7 login screen, you can change it by trying this simple hack. Here is how you can do it.
1. Launch the Windows Registry Editor by typing Regedit in Start Menu
2. Go to ‘HKEY_LOCAL_MACHINE\Software\Microsoft\Windows\CurrentVersion\Authentication\LogonUI\Background‘.
3. Double-click the DWORD value called ‘OEM Background’ to open it and enter 1 in the Value data field.
Note: If the DWORD ‘OEM Background’ is not there, you need to make it.
4. Browse to the background image that you would like use on the log-in screen. A JPEG file that is less than 245 kb in size can only be used here.
5. Copy the image you want to use into the ‘%windir%\system32\oobe\info\backgrounds‘ folder. If the folder is not present, you need to create it.
6. Rename the image to backgroundDefault.jpg
7. Restart your computer to check the new login background screen.
Enabling Quick Launch

Quick Launch is a place where you can add set of icons that you frequently use. This feature can be found in Windows XP and Windows Vista, however it is not present on Windows 7. You can enable it by doing the following hack:
1. Right click on the taskbar and then select New Toolbar.
2. You need to put the following location %userprofile%\AppData\Roaming\Microsoft\Internet Explorer\Quick Launch in the new window that appears.
3. Next, click on ‘Select Folder’.
4. Quick Launch will appear on the taskbar but will contain text of the respective icon. To hide it, click on the dotted lines and uncheck ‘Show Title’ and ‘Show Text’
Sunday 8 April 2012
How To Block websites without using any software

It is easy to block a website on a computer using any software or just by changing the dns server and making few settings but if you don’t want to use any additional software or service then too you can block websites on your Windows machine. All you will require for this is :
- A windows machine.
- A text editor (notepad will do).
- A web browser .
Just follow the steps given below to block a particular website.
- Navigate to the C:\WINDOWS\system32\drivers\etc
- Find the file named “HOSTS”
- Open it using notepad.
- Under “127.0.0.1 localhost” Add 127.0.0.2 www.orkut.com , and that site will no longer be accessable.
- Done!
example :
127.0.0.1 localhost
127.0.0.2 www.orkut.com
127.0.0.2 www.orkut.com
- www.orkut.com will not be accessible anymore.
If you want to add more sites then just increment the IP address by one and add it to the list.
i.e. 127.0.0.3 www.yahoo.com
127.0.0.4 www.msn.com
127.0.0.5 www.google.com
127.0.0.4 www.msn.com
127.0.0.5 www.google.com
You can use this trick to block popup sites as well or any other advertising site.
Enjoy
remove virus from pendrive
If you are using pendrive for data transfer at school, college or at your office or any where
you must have come across the VIRUS creates an exe file in your usb drive with the name New Folder.exe.
WITH THIS VIRUS
Task manager is disabled.
Registry Editor is disabled.
Folder options not working.
Taking too much time for accessing pendrive.
Uses half of your computers processing power.
now you can easily remove this virus
Just download the tool from the link below.
Run this downloaded exe by double clicking on it.
Then click on “Delete Autorun.inf file”.
After that click on ” Remove virus from USB”. The virus will be removed from your pendrive.
with this tool you cal also restore your task manager, registry editor and other things which were disabled by virus
just click on “Restore Default Windows Settings”. thats it.............

Saturday 7 April 2012
Computer Pranks
Today , I will show you 3 great computer pranks :make over 1,000 folders in few second ,microsoft word prank and cool windows prank ;that will frustrate your “friends” very much.
1)Make over 1,000 folders in few seconds
Here I will teach you simple prank that will make an unlimmited amount of folders in any place you want.

Step 1
Open notepad and type :
@echo off
:top
md %random%
goto top
@echo off makes it so that it appears to be a blank screen but actually its making hundreds of folder.
md %random% is command that creating folders with random names.
goto top – return to label :top , infinite loop

Step 2
Save it as 1000folders.bat

After that you will get icon that looks as show below
People probably not going to click on an icon that looks like this picture so to make it better (funnier and easier to prank people with) make a short-cut to it.
Step 3
Right click on icon and click Create Shortcut

Step 4
Right click on shortcut and click properties , then click on Change Icon and rename icon


tell the person that you found the music they wanted and downloaded it on there computer, that way they will think its a shortcut to the music and they will click on it then they will think its loading so they wont exit right away when they finally realize its not going to load or so many errors have came up they realized
somethings wrong it will be to late) also just something to know its impossible to delete them using cmd you HAVE to find all of them and delete them manually…
2)Microsoft Word Prank
Here , I will show you great microsoft word prank that will frustrate the victims very much, whenever they type a certain word, another word appears! This prank is great for office and schools.
Step 1
Launch microsoft word
Step 2
Go to Tools -> AutoCorrect Options…

Step 3
In the space where it says Replace , type a real common word such as the, and, a,I, you etc. In the space that says With , type in a crazy word such as fdgfdhkihyob45, whatever you want! Then , click on Add

3) Cool Windows Prank
This will make it to where your friend cannot click on anything on the screen.
Step 1
Take a screenshot of the desktop. You can use windows printscreen or one of the many printscreen software. I prefer to use PrtScr.

Step 2
Make your printscreen picture as desktop background.
Step 3
Right click on desktop , then click View->Show Desktop Icons

That is it , when you click on the “icons”, nothing will happen!
Subscribe to:
Posts (Atom)
